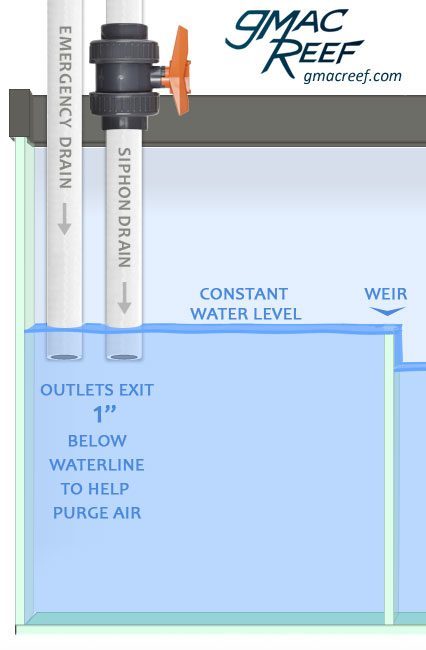
The Herbie Overflow Method is a simple, proven plumbing setup that’s been around for many years. At it’s most basic, it consists of 2 standpipes in an overflow; a main drain regulated by a valve that runs as a siphon, and a separate unrestricted “emergency standpipe”. The setup enables you to:
- run a completely silent drain from the overflow to the sump below
- have it be completely fail-safe from possible flooding with proper design and maintenance.
It is the simplest plumbing method that accomplishes both of these things.
History
The method was popularized by a Reefcentral.com thread started by a forum member “Herbie” around 2004. As people started using the method on their tanks, many forum threads started and there are literally hundreds of posts out there about it. The difficulty lies not in the method itself, but in sifting through all those bits and pieces of info just to figure it out.
About this guide and a heads up
This guide explains the regular operation, each component of the design, and gives tips along the way. For the sake of simplicity, all of the content and diagrams describe the most simple and conventional Herbie setup, — an overflow box with standpipes coming in through the bottom. In some cases the pipes will have to pass through the side of the tank, but the mechanics of everything will be the same.
You should be aware that:
- It is not completely a “set-it-and-forget-it” method… It needs to be regularly inspected and properly maintained. See Best Practices
- There are all kinds of people out there who run the system in one form or another, and they all have a slightly different opinion on how they think things should be done. I am only one of these people. the most important thing is to understand your own setup. You can choose to do things differently with certain parts of the design, but try to be aware of any risks you may be opening yourself up to when you do so.
- There is another similar method called the “Beananimal” drain (also named after its creator) which is slightly more complicated in design and uses 3 standpipes vs. only 2. The Beananimal is superior in many ways including running a “dry emergency” drain (increased safety), and having much more capacity than the Herbie design.
- For the sake of clarity, I won’t attempt to explain the Herbie and BeanAnimal designs at the same time. The goal is that you will not only understand the Herbie design after reading this, but start to see it’s limitations.
The Siphon that makes the Herbie work
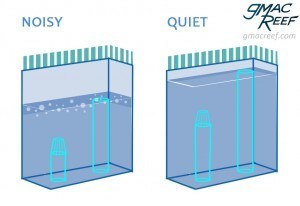
Any time you have air and water flowing through the same drain, you’ll get noise with even low amounts of flow. This is the main shortfall of single-pipe-drain methods like the Durso and it’s siblings. Aside from running silently, a siphon drain has much more flow capacity because air never runs through the pipes once it gets going.
The way the siphon on the Herbie is achieved is by manually constricting flow on the main drain with a finely-adjustable valve. Once the air is purged from the line and the siphon is fully engaged, it continues to run this way 24 hours per day until something interrupts flow like the return pump being shut off.
The rate that a siphon moves water is similar to a return system.
For a return pump, the greater the distance the pump has to push water up to the tank against gravity, the less flow exits the return outlet.
So for a siphon, it is working with gravity — water moves through the pipe faster the further it has to fall straight down.
So as you increase vertical distance between the inlet in the overflow and the outlet down in the sump, water moves faster.
Ideally the siphon pipe should run straight down to the sump, with no excessive horizontal runs (anything less than 24″ generally is no problem). This isn’t always possible, but you should keep it in mind. Flexible pipe can make curves more gradual, and can using 45° fittings instead of 90°’s for bends on rigid lengths of PVC.
Adjustment of the Valve
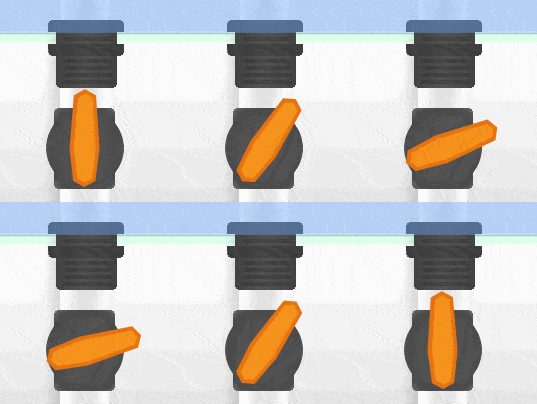
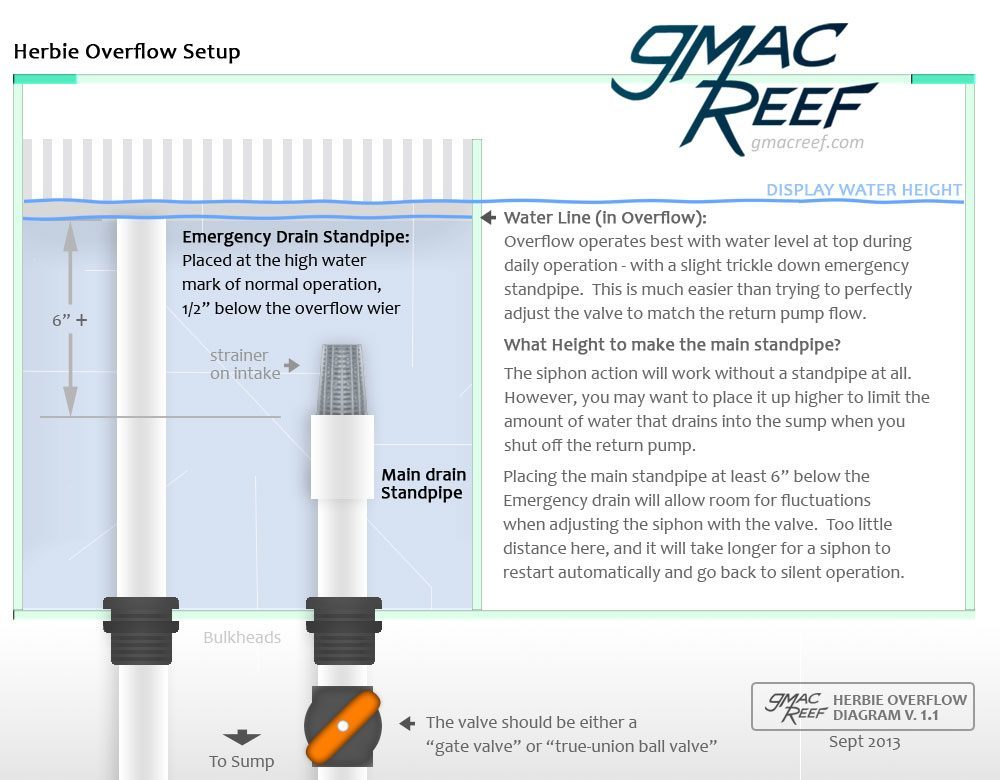
To begin, the valve is opened all the way — then slowly closed off until the siphon is achieved. Fine adjustments are then made until the flow of the siphon closely matches the amount of water being returned to the tank, which will stabilize the water level in the overflow.
Perfectly balancing the water level until it remains totally still inside the overflow is difficult and time-consuming to achieve even with a Gate valve. Although it can appear stable and stay that way for a while, slight variations in the system such as changes in resistance of water through the plumbing will inherently change the rate of flow over hours or days. For example, the growth of slime in the pipes.
Simply by allowing a very slight trickle of water to enter through the emergency standpipe at all times, you sidestep the nearly impossible requirement of perfectly adjusting the valve. We are talking a trickle here — just enough to negate the need for constant fiddling, but still allowing the emergency drain ample capacity if needed.
To accomplish this, you simply stabilize the water level as best you can inside the overflow, then close off the valve’s flow a very tiny amount past that point. After this tiny adjustment, the water level inside the overflow will rise, very slowly, and come to rest at the level of the emergency standpipe — where the trickle of water will begin seeping down it.
So what is a Trickle?
Using a term like “trickle” leaves the actual amount to interpretation.
If you fill a styrofoam cup with water then poke a hole in it with the lead of a pencil, you will get an idea of what to aim for (and allow) with your trickle. Think “seeping” and not “flowing”.
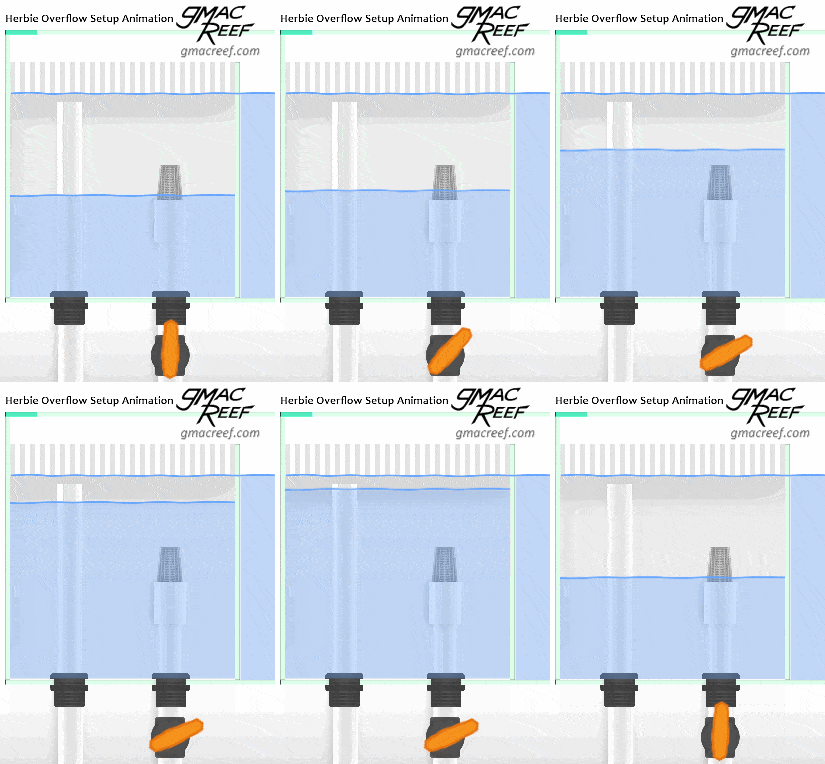
The Effects of running a Trickle
A slight trickle of water flowing down the emergency pipe has a few effects on the system including:
- Inside the overflow box, the operating water level remains up at the top. Water passing over the the weir falls only a short distance, so it won’t splash and create noise.
- A trickle of water breaks the surface of water inside the overflow, preventing any scum from accumulating.
- The need for constant adjustments is reduced considerably. Sounds great, right?
- But don’t forget – Your Emergency line goes from dry to wet. Running any amount of flow down the emergency adds risk to the system. It’s a level of risk that many choose to live with and minimize the best they can, but present nonetheless.
Let’s Pause Here… For the sake of discussion, I’ll mention a debate that currently takes place. It regards running an Emergency drain with the Trickle method. There are some people who think that running a strictly Dry Emergency that never touches water is the only way it should be done.
I have the opinion that running a Trickle down the Emergency drain can be done in a safe manner in conjunction with following best practices like using a strainer on the siphon inlet, overflow teeth on the weir and a covered overflow box. I wanted this guide to be just about explaining the basics vs. debating different opinions, so that subject is in a separate post here Herbie Overflow Dry Emergency vs. Running a Trickle
Moving on…
System Design
Valve Selection
Due to the need for fine levels of adjustment, installing a quality valve is suggested.
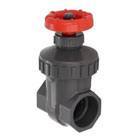
Gate Valve
This valve allows precise adjustments to be made with a minimum effort. The “Spears” gate valve (shown) can be taken apart and is regarded as the best available option.
Ball Valve
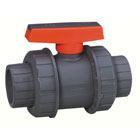
The higher quality ones have a smooth opening/closing action, and built in unions which are an advantage. A “Single Union Ball Valve” or “True Union Ball Valve” are the only ones that should be used. They are cheaper and easier to find than gate valves. The common “Straight Ball Valve” should be avoided.
Think Ahead – Add A Union
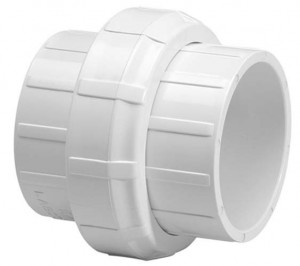
If the valve doesn’t have a union built in — one should be installed between the valve and the bulkhead so you can easily detach your hoses and get to the valve assembly with relative ease.
Valve Placement Vertically on Main Siphon Drain Line
The vertical position of the valve on the siphon line plays a part in how fast the siphon starts.
All things being equal, the siphon will purge air and start faster if the valve is down closer to the pipe’s outlet. This is because as water fills the pipe, the air exits the high section of pipe easier than the low section that’s after the valve. That is — less air needs to purge and exit the pipe downwards.
A simple and common way to run your setup is with the sump in the stand below the tank. This means the siphon line coming down from the display tank is only a few feet long. You can help the siphon start quickly by doing a few things: Plumb the drain with a minimal horizontal run, and have the drain outlet the proper height.
When the siphon is re-starting, such as when you restart the return pump, it will take up to a minute in some cases to get going again.
By placing the valve all the way down at the sump just before the water level, the pipe will go full-siphon the quickest. But in reality, it does not matter much whether the siphon goes into silent operation in 30 seconds vs. 45 seconds for example.
You can place the siphon valve directly below the bulkhead, or all the way down at the outlet. The difference in time to go full-siphon is only a few seconds with most tanks. So having the valve in a convenient spot to reach can often take precedence.
Dialing in the valve can often take a minute or two until you get the hang of it. So if you place your valve where it’s easy to reach, then you’ll thank yourself later.
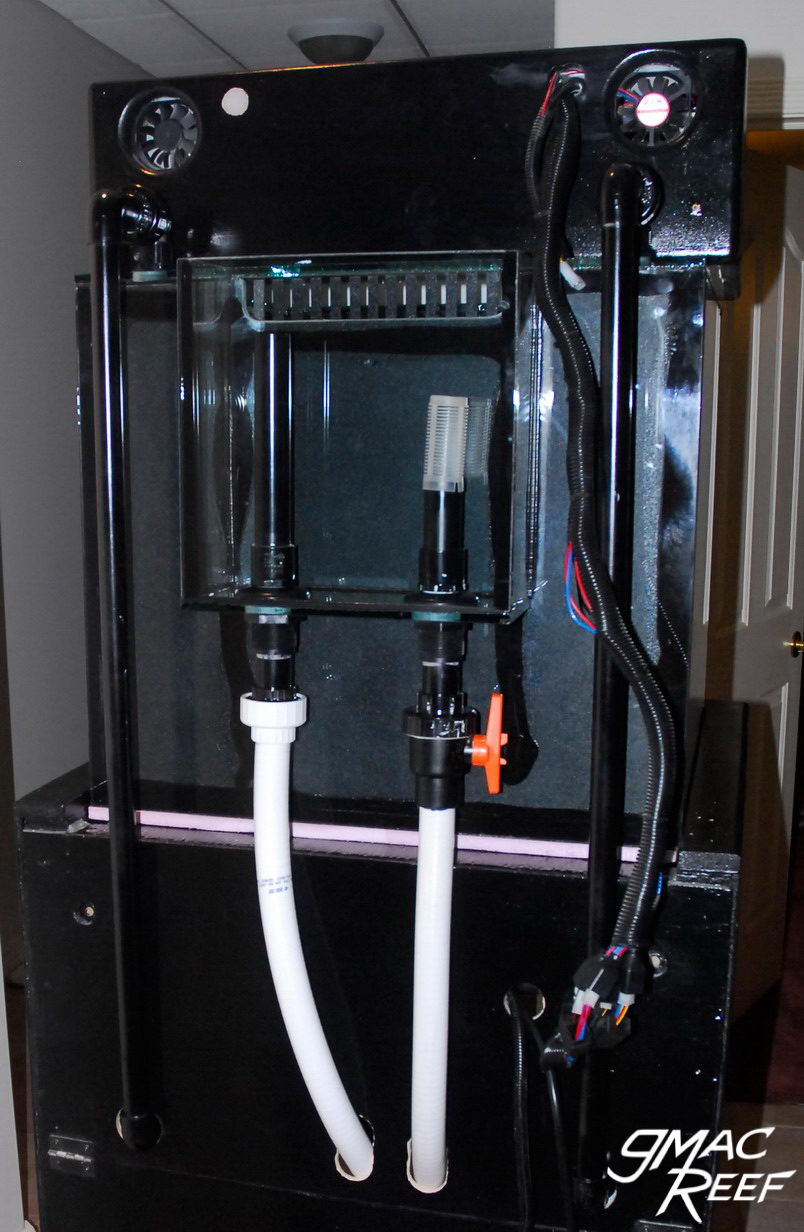
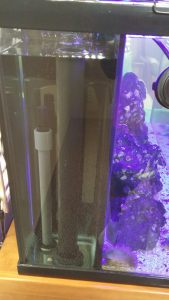
On my tank (shown in pic above) the valve is just below the bulkhead. It’s a lot easier to dial in the flow when you have your hand on the valve and a line-of-sight to the water level in the overflow. In this case adjustments are made standing next to the tank rather than crouched in the cabinet.
In cases where there is a long run in the siphon line, such as having your sump in a basement, low placement is much more important. In this case the valve needs to be located it down near the sump to prevent trapped air in the pipe.
Main Siphon Standpipe Height
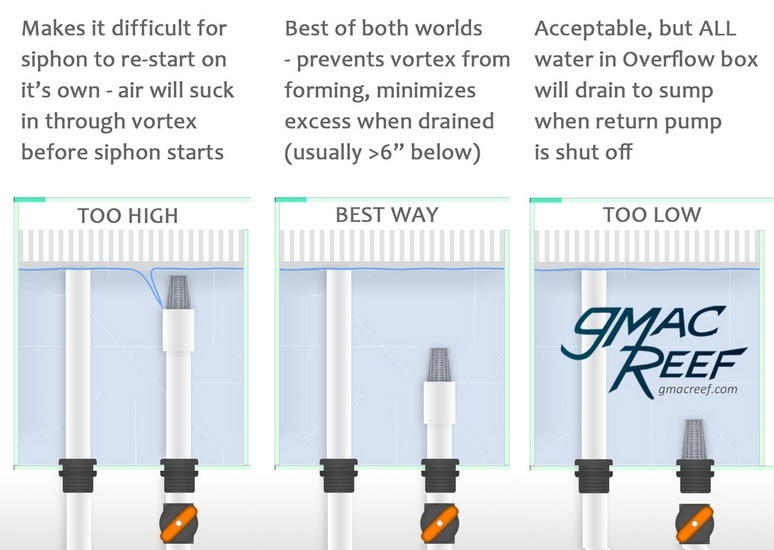
A sufficient volume of water above the siphon inlet prevents air sucking down from the surface into the pipe, sometimes referred to as a Vortex. If one forms, it creates a slurping noise. They will also interfere with the line going into full-siphon.
6″ is a general rule. It is based on the rough dimensions of many overflow boxes.
Keep in mind though, it is not as much about how deep, but rather how much water volume is above the siphon inlet. More water volume above the inlet = more water forcing the air down the drain to create the siphon effect.
Many of the commercially available overflow boxes are made as small as possible. Why? They are easier to ship, use less material, and have better aesthetics.
But with a small overflow box, there is less water volume to purge air down the drain. So the 6″ might not be enough in those cases, or with a larger box, it may be more than you need. The height of the siphon inlet in the overflow is something you may want to experiment with.
If you forgo the raised main standpipe (such as on the right of pic above) it will take the guess work out of it, just be warned that ALL the water in the overflow will drain into the sump when you shut off your return pump. This water needs to have a place to go without overflowing the sump. Also – any livestock in there (even if they shouldn’t be) will be left high & dry.
Emergency Drain Setup
This drain is what makes the system fail-safe in the event of the main valve standpipe getting clogged. It should be designed simply as a straight (as possible) unrestricted pipe going down into the sump and into the water, never joined with other pipes.
An open-ended standpipe will act as an alarm in a way. With only a small trickle of water seeping into it, it will make no noise. If there is a partial blockage of the siphon line, then the Emergency drain will start to take on more water and you will hear a loud hollow noise, alerting you that it needs attention. This is one reason that you should not try to muffle the Emergency drain.
You want the emergency to have max capacity, so most people leave it open and don’t use a strainer on this pipe.
Emergency Drain Standpipe Height
As a measure to prevent noise from falling water in the overflow, the emergency standpipe inlet should only be around 1/2″ – 1″ below the height of the overflow weir.
You want the height of the E-drain inlet to minimize water’s falling distance over the weir… but just high enough to limit splashing, no more.
The distance between the E-drain inlet and the top edge of the tank needs to be a few inches to aid with capacity. This is needed in the event of a main siphon line blockage.
If this happens, the E-drain will possibly need to go full-siphon as well. If the standpipe places the inlet too high up, a siphon may not be able to engage on the E-drain if it has to before the tank’s water level swells to the top edge of the tank and starts to overflow it.
Starting and Stopping
When the return pump switches on, and water starts passing through the overflow, the siphon should engage and go back to normal operation completely on it’s own. While this is happening, you may observe a temporary increase in water going down the emergency standpipe. This should only go on for a minute or so until all the air inside the main siphon line can purge through the outlet down in the sump. The siphon will then engage and take on the full capacity you adjusted it for.
Under the tank
Drain line Outlets in the Sump Below
Both drain outlets should run down from the overflow into the sump below. The siphon drain must have it’s outlet submerged, but by <1″. Any deeper, and air can’t purge from the outlet as easily when the siphon is starting. It should also be located in a sump chamber with a constant water level.
The emergency line is usually also submerged to limit any sound from splashing from running a trickle. This outlet should also be submerged to a depth of by 1″ or less. If the main valve siphon gets blocked, the emergency pipe will take on the extra water. If the e-drain needs to go full-siphon, you don’t want to impede that by submerging the outlet down too far because that is where air is purged.
In the diagram, the emergency drain is shown right alongside the siphon drain. The e-drain does not need to go into a particular sump chamber. It should be plumbed the way that provides the straightest path down to the sump without horizontal runs.
Sump Capacity
When the return pump is shut off, the water level inside the overflow will drain and come to rest at the level of the siphon inlet. The height difference between the emergency inlet and the siphon inlet will determine how much water will drain to the sump. Make sure the sump can accommodate the extra water without overfilling.
More in-depth info about sumps and what to keep in mind with a siphon-based overflow method on this page: Reef Tank Sump Design
Avoiding Common Pitfalls
Trying to Tee the drain line

Horizontal Runs of Pipe
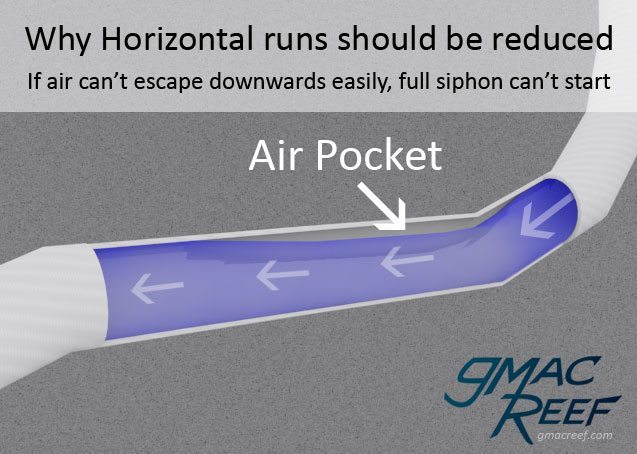
Both the emergency drain and the main siphon drain should be run straight as reasonably possible downwards into the sump, as any excessive horizontal runs will make it more difficult for all the air inside the line to exit the pipe down in the sump as quickly. It’s generally only an issue if a horizontal run is over 24″ long. If you have sufficient height, you can get away with longer horizontal runs without too much issue.
For the Return line, horizontal runs are fine. This is because returns have water being actively pumped, rather than draining due to gravity only.
Best Practices for a Problem-Free Overflow Box

Doing these things will make the main siphon less likely to clog.
Use a Strainer
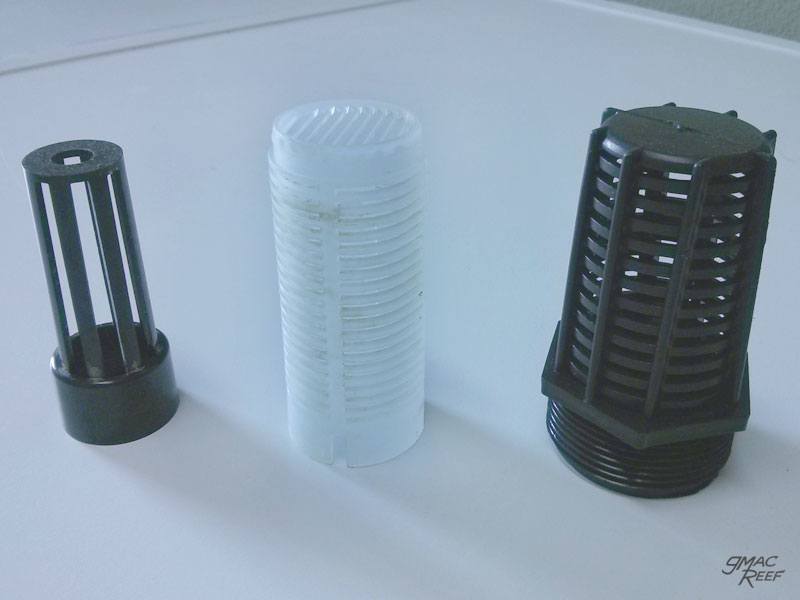
Install a Strainer on the Main Valve Standpipe. This will keep any debris, small snails or algae clumps from interfering with the valve and choking off the drain. There are different strainers out there, and one with smaller holes will protect better, but clog with junk faster. Try to get in the habit of inspecting the strainer when you observe and check on your tank. After all, you want it to prevent clogs, not be the source of one.
You might be thinking, “I don’t need no stupid strainer” — YES YOU DO!
Listen up.
With the nature of a siphon, water moves very quickly through the valve opening. Most times you’ll find that the valve needs to be closed-off in excess of 50% shut to achieve balance from the return. A mostly closed-off valve opening is very small during operation. This makes it more susceptible to obstruction by an object.
Having a strainer in place is the last line of defense before your main drain clogs.
Cover Your Overflow Box
A covered overflow will prevent livestock in the tank from jumping or crawling inside. This is a good idea to further protect the valve against clogs, and can also help to limit algae growth. You’ll also save yourself having to catch a stray fish inside the overflow which is a real pain. A simple piece of acrylic cut to size does the job.
Visual Inspection of the System
You might want to place your overflow in such a way that you can easily look into the box. You want to know:
- Is the water level where it should be?
- What is the condition of the strainer? Does it need cleaned?
- Is there any debris or livestock in the box?
Other Considerations in your System
Is my tank’s glass even suitable for drilling holes for bulkheads?
Drilling and mounting bulkheads to a tank adds lateral weight and forces on the glass. What this means is that the leverage from plumbing pipe and fittings will create pressure points on the area around the glass hole.
These physical forces determine which aquariums are even suitable for drilling. Glass with thickness of at least ¼” can typically withstand these forces, and glass with a minimum thickness of a quarter inch (6mm) is generally only found on aquariums with capacity of 40 gallons and over with a few exceptions.
Don’t waste your time or risk having a future catastrophe later on by drilling a tank that isn’t suitable. If the glass is too thin and weak to support bulkheads, then it’s a lot more likely for cracking to occur.
As always, check to make sure the glass you are drilling is not tempered. There are many videos on drilling glass on YouTube and it’s easy to do with diamond hole saw bit. Drilling techniques and hole placement is covered in the Drilling Holes in Glass Aquarium Tanks Page
Size of plumbing
There is a general consensus that the Herbie method should never use less than 1″ pipe for plumbing, no matter what size tank. You want to be 100% sure that your single emergency drain is completely capable of handling all the flow that the return pump can throw at it in the unlikely event of total clogging of the main drain.
If your tank came pre-drilled with 2 holes in the overflow as in a lot of older “reef-ready” tanks, use the one with a larger diameter (usually 1″) for your emergency and the smaller diameter one for the main siphon drain. Keep in mind that your flow will be drastically reduced on smaller size pipe. – (See Figure 5 for picture).
For systems where return pump flow is up to around 330** gallons an hour, running a 1″ emergency line will be sufficient. For tanks above about 120 gallons you may want to bump-up your plumbing size to 1.5” in diameter. These can handle way more flow.
The trend in the last few years is to use efficient powerheads to create high flow in the tank, while running a moderate amount of flow through the sump. This means you can run a smaller, quieter return pump and not push the capabilities of your overflow design as much which is a smart strategy.
**While a full siphon in a 1″ pipe can move over 1500 GPH, a single 1″ line that is simply draining (in that siphon action has not yet engaged) can safely handle around 330 GPH. This is a low estimate, but There is more to the discussion of plumbing size that is not in the scope of this guide. Bigger is better with plumbing size. Here is a link about pipe diameters and flow. The Flowrates through various Bulkheads (In relation to overflow drains)
Return pump plumbing
The return pump also plays a part in the operation of the overflow and in short, simple is better. Any variations you add into the plumbing of the return line can have effects down the line.
To avoid having to constantly readjust the siphon valve, the return rate should be kept at a consistent rate. Any fluctuations that would take place from day-to-day should be minimized.
A common practice is to to Tee off the line above the pump to feed a Refugium sump chamber, and this is generally okay to do.
If you are going to Tee the return line, the offshoot should only direct to a place providing consistent resistance.
Some people will add a manifold of valves to direct flow to media reactors. This can be less than ideal with a siphon-based overflow method.
If the return pump is Tee’d off and also feeding a media reactor in the sump, then variations in water flow will start to happen. Water resistance inside the reactor will slowly change as the media becomes depleted or dirty. This in turn changes the rate of flow pushed up to the display, then falling over the weir and into the overflow.
All this means is that if the setup allows for variations in flow, the valve on the siphon will need to be adjusted more frequently.
More in depth info about plumbing return lines in this article here: Reef Aquarium Return Line Plumbing – A How-to Guide
Assembly and Gluing
Inside the overflow, your plumbing fittings can generally be slipped & threaded together. These fittings don’t need to be glued as there is no risk of leaking externally. Having your overflow box fittings not glued allows you to make changes while initially testing out the system. Trying various pipe lengths for the standpipes inside the overflow is often needed.
On the exterior of the tank, fittings and pipe should absolutely be glued with PVC solvent (available at any hardware store). Installing unions between the outside of the bulkheads and the plumbing lines/valve is a good idea and allows for the hoses to be removed for cleaning or if you have to move the tank.
More info about how to glue and connect the various pieces: Plumbing Assembly for your Reef tank
Testing the system
There are a few initial tests you should do with the system to ensure problem free operation for years to come. Any problems are better to find out in the garage than in the living room. As long as it passes these tests, then you are ready to go.
- Close off the siphon valve completely in order to test your emergency drain’s capacity. You must confirm it can handle what your return pump is pumping up to the tank with ease. If using a controllable DC pump, make sure the drain can handle flow at 100 percent power.
- Ensure you have the right sump capacity by turning off the return pump, then watch both the drain and return lines empty into the sump. Make sure it can handle the extra water (also watch your skimmer).
What about Freshwater?
There is no reason why this method can’t also work for Freshwater tanks. One thing to note – if you have Freshwater plants, there will be a lot of dead pieces/clippings constantly getting into the overflow system. These can clog overflow teeth, or a strainer. Use care.
One Final Note
Ultimately you are responsible for your own tank and your own property — there is the potential for water damage that comes from owning any aquarium. As I have said earlier, the most important thing is to understand how your own system is set up. Learn as much as you can and don’t cut corners. Enjoy your quiet tank!
About this Page
While my original post was written in June 2012, it has grown into a full guide. I have made several edits to clarify some of the concepts and added a few sections based on some if the comments left below and various forum threads linking here. Thanks to those who have participated in the discussion. Ask me a Question using the Contact Form or write it in the comments below.
Thanks for this site. The one question I have after reading any sites about the Herbie overflow relates to the emergency drain. Most sites show the emergengy drain as being an inverted U and say to run the drain below the water surface of the sump. Will that work if there is no air hole in the U?
I have seen the added elbows to form the downward U on the emergency drain on a few diagrams and pictures such as you described. This is borrowed from the design of a Durso drain to minimize noise.
There can sometimes be a hollow sound echoing through the emergency drain – this just means that the valve on the main drain isn’t adjusted correctly (too little flow) and is allowing too much water to pass through the emergency drain. It is normal to hear the noise for a few seconds as the siphon gets going again (such as after you turn your return pump back on) During normal operation you want just a trickle of water going down the E-drain — which won’t make any noise.
The downward U on a Herbie E-drain is unnecessary and can potentially reduce it’s capacity. It also hides the opening which should be regularly visually inspected. I just wouldn’t use it at all. — Edited June 2016
I think I’m with you and would not use the inverted U; however, I still can’t see it working with the sump end submerged, too. Thanks for getting back to me.
By the way, I hope to try a Herbie overflow in a couple of weeks. I’m looking forward to it.
I assume this system would make the BeanAnimal Overflow System Obsolete due to the fact that this system is MUCH less complex. Anyone have experience with both or know of any features in the BA system that the Herbie does not cover? The Bean Animal Silent Overflow can be seen at Reefcentral dot com in the DIY forums. Thank you GMAC for posting this simple system with thorough explanation. I will be incorporating it into my current reef build. Cheers!
The Beananimal system won’t be made obsolete as it really is a superior system. It has the advantage of running a dry emergency, as well as continuing to operate silently with small changes in flow down the Open Channel. The Herbie has advantages in being simple to design and operate, but having 3 pipes instead of 2 will is a safer overflow no matter how you look at it. If you you are building an overflow and you have the space, it is worth continuing your research into building the Bean System.
The BA system is more complicated, using less commonly available parts, and more of them. It can be confusing to figure out where to drill the holes, and what does what. Truth is most people don’t want to spend hours rounding up parts, researching, and then assembling the BA system when they can achieve a silent overflow with 2 standpipes. Although there is a decent writeup of the system basics on the Beananimal website, people who have questions have to go to the massive (7000+ posts) Reefcentral threads to get their questions answered.
Here is a link to the guide, definitely give it a read if you are building a custom tank.
Bean Animal Overflow System
Is an internal overflow box absolutely necessary?
Well that depends… The siphon and the emergency line will operate the same whether or not they are contained in an overflow box. Overflow boxes provide a few benefits: they allow you to keep the water in the tank at a set level, hide ugly PVC pipes, and provide more protection against debris for the main siphon drain (which should have a strainer on it).
If you are not running an overflow box at all then there will be a large volume of water that will fluctuate between the tank and sump during the stop/start of the Herbie operation that you probably don’t want. The best looking way to do it in my opinion is to run an overflow box that is mounted to the back of the tank for your standpipes, with a channel for your overflow cut through the glass. See the pic in the post.
My herbie overflow has to be “restarted” every time the return pump is turned off. The last pipe from in intake goes fully into the water in my sump and if i turn it off and back on again, I have to take the last pipe off and let it drain for a while before I put the pipe back on or else it will just go through the emergency drain and not use the actual drain pipe.
If your main drain siphon is not restarting on it’s own in under a minute it then it could be a couple things. This can usually be corrected by shortening the standpipe height in relation to the emergency drain. There has to be a sufficient amount of water to create enough pressure in the main drain to purge the air inside and restart the siphon. This can also be helped by making sure the drain line exits into the water level in the sump by only a few inches so the air in the line can escape easier.
I want to thank you for your very informative article about Herbie overflow.
Recently I design my own in a 75g tank. I have the e-shopps nano overflow and the eheim 1000 pump as return.
I’m facing the following issue with my herbie. When I’m closing the ball valve to reach the point where my emergency hole is, automatically the water level in my display is rising as the water in the overflow box behind my tank rises. This is normal? Also it seems that I can’t adjust the water level in my display tank by lowering the overflow box, maybe there is a relationship with the return and siphon?
Best Regards
Ziras George – Greece, Athens
Thanks for your comment, but I really can’t give you any advice on this, as I have no experience with any type of hang on overflow box. The design of them is just too flawed IMO, and to be honest I am not sure how anyone can trust that these devices will restart a siphon before the tank overflows. To be blunt – I think that they are garbage… yet also unfortunately too commonly seen in this hobby. Drilling the tank is the only way to go and much easier to do than one might think.
What is the advantage of placing the valve near the overflow rather than at the sump? Wouldn’t the pipe fill faster with the valve installed near the sump?
The siphon will start a few seconds faster if the valve is down closer to the pipe’s outlet. In most cases the exact position of where the valve is installed on the siphon line doesn’t make a discernible difference at all unless your sump is located in your basement (in that case you would locate it down near the outlet). It is more a matter of convenience and having easy access to reach the valve with your hand to make those fine adjustments. The advantage to mounting it high in my case is it’s a lot easier to dial in the flow when you have your hand on the valve and a sight-line of the water level in the overflow. If the valve is mounted under the cabinet, then that makes it a bit harder because you’ll have to go back and forth. On my tank I opted to install it under the overflow so I could reach it easily while standing next to the tank. Update 3/2/2016 – I added more info about this to the post.
Hi!
Great website, much better illustrated and explain! Better than BA website….BA website got just too much redundant words too little important details…..
But i got a real worrying question regarding Herbies, you said, You should be aware that: It is not completely a “set-it-and-forget-it” method… It needs to be regularly inspected and properly maintained.
What should i inspect and maintain? I am not following on that!
One more to go… On the BA web he said his is absolutely “set and forget” type….. But i don’t understand the very basic of his system about two hose face down, that makes me worried when pump tuen off, and the drain wont start….. Do you know how BA start it self?
The statement “It is not completely a ‘set-it-and-forget-it’ method… It needs to be regularly inspected and properly maintained” is just me beating the drum that you should use a strainer on the main siphon drain, and it is something you need to be keeping your eye on. Depending on what type you use, it will eventually become dirty. Cleaning isn’t normally necessary too often, but is critical for problem-free operation. The use of a strainer is really the only way to claim that the method is completely safe in my opinion. Doing this will ensure that the Main siphon drain is protected — as a clog is most likely to first occur at the narrow choke-point of the valve. I added a link to the strainer section at that part of the guide to clarify.
The topic of choosing a Herbie design vs. Beananimal design is really a subjective matter of personal taste and what level of extra safety/redundancy you desire on your own tank versus how much time and effort you want to spend researching and building an overflow.
I’d rather not discuss specific questions about the bean design here as it is out of the scope of this post, but may cover the method in another post in the future. Thanks for commenting.
Thanks for taking the time to put all this up in a way that is easy to understand. You’ve saved me hours!!!
Is there any reason not to make the emergency overflow a slightly larger diameter than the main drain?
Glad it helped you!
You can make the emergency drain larger in diameter, but it’s not an option for everyone who is just retrofitting an existing tank with the method. If you have 2 pre-drilled holes, then yes — the larger one should be run as the E-drain to get max capacity out of it.
Hi, where can I purchase these strainers or is there another word for them as I can’t find them anywhere.
They are called Bulkhead Overflow Strainers and you can get them from Bulkreefsupply. Some people also create them DIY with a tube made out of plastic mesh.
You rock! I started with a durso drain and the bubble draw was not acceptable. I had already drilled the tank and only read most of this article when I thought: a tee! Then I saw Boromir. I laughed with that all day. I drilled a third hole in my living room and now have a Herbie and no bubbles. Thanks!
Does anybody know of anywhere in the UK that you can buy these strainers from because I can’t seem to find them anywhere?
These are also a fairly easy to make DIY item by making a tube out of sturdy plastic mesh or “gutter guard” material.
Thanks for the site. I’m completely new to this hobby (haven’t even gotten my tank yet). I may be purchasing a 90 Gallon tank that I plan to drill. Do you have pictures of where the drill holes should be or how an overflow box is placed in the tank. For that matter, where and what overflow box to buy? I can’t see any of that in the pictures. It looks like the overflow is outside the tank. I’m completely confused. Details please? Thanks
Drilling the tank requires some research of where to put the holes in proximity of the edge of the glass. I may expand the site’s content to cover some of that info in the future. EDIT: Check out this new page: Drilling Holes in Glass Aquarium Tanks
Internal Overflow boxes are the most common choice if you are installing on a standard tank. They are generally made of 2-3 custom cut pieces of glass that are sized to the tank, and siliconed in place. The picture you speak of is my custom built tank with an external overflow.
Is it possible to send your return flow back up the inside of the Emergency overflow pipe rather than having it run externally please ?
In almost all cases I would say no. Maybe if you had a very large 2″ emergency you could pass a small pipe (say 1/2″) through it and have enough capacity to do it safely. You would also have to factor in the increased friction losses from having another pipe in the line. It would of course depend on the return rate from the pump. I would advise against it because it would complicate the emergency going into full-siphon. It would be very susceptible to clogging compared to an open pipe, which is what the emergency line should be.
Thank you for the clear and concise diagrams. My question is why do you want the emergency drain below the water level in the sump? It would be safer to have it above the high water mark to ensure it flows without resistance should it be needed. If you had an issue with the water level in your sump and the e-drain ends up 5″ below the surface it may have a problem starting. The main siphon line is submerged only to prevent noise, otherwise a full siphon can happen with a wide open bottom. The water only creates back pressure, yes?
Well ideally the siphon outlet should be in the 1st sump chamber that has a consistent water level. This will have all the water passing over a baffle into the next chamber. This eliminates the possibility of the 1st chamber overfilling. Most overfilling is caused from back-siphoning from the return line and drainage from the overflow box. This happens when the return pump is turned off, not during normal operation.
The siphon line being submerged allows air to exit but not re-enter. It is critical to the design. The length of pipe below the valve needs to have the air purged before a siphon will start, otherwise it just acts as a gravity drain.
Some people have the e-drain outlet higher than the water, so that when the e-drain is engaged, it will create enough noise to alert them with the splashing etc. If you are running a trickle through the e-drain then it will be loud during normal operation.
I think it is better to run an emergency submerged 1″ in a constant-height sump chamber in the same way as the main siphon. This is because if the main siphon has a total blockage, then the emergency could also go full siphon if needed. The E-drain will still create a loud hollow sound if the flow reaches levels higher than just a trickle.
Good question – thanks for commenting.
Help please. Building a 330 gallon tank. Center back overflow. Want to drill 4 holes. 2 for a 1″ return each and the other two to build the Herbie overflow. My question is what size hole would you recomend to be able to handle a return pump of about 2500-3100 GPH? Would a 1.5 siphon stand pipe work with a 2″ emergency? Thanks.
If you are building your own overflow and are not limited by size constraints I would recommend adding a third drain pipe (dry emergency) to the drain setup. This will make it a Bean overflow. Using a 2″ bulkhead for the E-drain will mean that you have to build a large overflow box to accommodate it, and adding a 3rd pipe is a better use of the space . 1500GPH is about the limit of 1″ pipe at full siphon so I would use 1.5″ for all three drain lines. I also would recommend only running 5-7x of display volume for return rate.
Excellent advice. One last question if I may. Would you rather do a coast to coast overflow or a conventional overflow? Whichone would you go with if it was your tank?
I can see the value in having a coast-to-coast overflow for the benefits of surface skimming and gas exchange. Unfortunately most of the DIY builds of a C2C I’ve seen are awful to look at in a tank and detract from it’s appearance. I don’t think I would ever put an internal “L” shaped C2C box in my own tank for this reason. It seems like the better an overflow design is in terms of functionality the worse it tends to look!
I am working on a new post about some of this stuff. It will cover things like the types and sizes of overflow teeth and why you need surface skimming in the first place. I hope to cover the design / aesthetic appearance aspects of overflows as well.
Thanks so much for the pics and explanation my overflow was super loud and after reading this the only thing I had to do was adjusting my valve to decrease the flow and now no more noices
First off thank you for all the information. The time you took to present and put together is invaluable so thank you very much. Getting on…. I am currently getting ready to transfer my current 75 gallon reef aquarium onto a new stand and custom sump that will hold an additional 50 gallons. I’ve decided to go with hard plumbing as I love the clean look and have decided to incorporate the Herbie Overflow System.
My problem is that when having my sump built the first process I planned for began with water from the in-line outlet would drop into the mechanical filtration, which is a sock, before going on into the skimmer. As you explain the Herbie System the main siphon outlet should exit 1″ below the water line to help purge air. Would my line have to go into the sock and have to be below water? Seems like it might be a pain in the ass to remove and replace every week I change out sock…. Please tell me your thoughts on this.
Second dilema I am facing in that my overflow box must be old school with just 2 lines, 1 for the water from display to drop down into the sump and the other as the return. Planning forward the larger line will be used as the emergency drain and smaller as the main siphon. I will be planning soon how to drill a 3rd hole next to other 2 as a new return line back into overflow box and into aquarium. Question for you is if what I am planning for is it okay for a correct working Herbie Overflow System???
Appreciate the feedback and keep up the great work. The hobby loves it.
The filter sock would indeed have to be placed on the outlet of the main siphon as you have described. In my experience it is a pain to change the sock this way because you have to push it underwater when you remove it and some of the junk escapes from the sock.
Quite a few people build a mini-chamber in the sump for the drains to empty into. This allows them to be submerged which is necessary for the siphon outlet. The water drains into this chamber then passes over a baffle where it falls through holes in a sock tray. This makes it much easier to change them out and run multiple socks at the same time.
As for your second question, a 3rd hole can be drilled next to the others in some cases, but you have to make sure there is enough distance to the other holes and the edge of the glass pane. This depends on the size of the existing overflow box. It is simple to plumb your return over the back of the tank and you don’t have to worry about any of this or if your bottom pane is tempered.
Thanks for the compliments and for your comment!
Thank you for the information. Question. I know you said that the pipes have to be vertical, I’m building a basement sump and frag sump cannot go directly below the tank therefore vertical is out of the question. Could the pipe be at a slight angle downward like a sewage pipe? Would this still allow for the siphon to start?
The pipes do not necessarily have to be vertical. You will have less problems starting the siphon if they run as vertical as possible. Horizontal runs of pipe are what you want to avoid. Generally an angle of 45 degrees or less is what you should aim for.
one more question. My tank has 2 overflow boxes. with 2 holes each. I plan on doing herbie in both sides. Is it possible to connect drains on both increasing diameter of pipe down the line. so essentially, go from 2 1in drains to 1 1 and 1/2 in pipe down the line?
In a word, no. Joining pipes means you either lose capacity or won’t be able to keep the water level in the overflows independently adjusted. More info: http://gmacreef.com/herbie-dual-overflows/
Hello,
I would just like to say this is a brilliant site with perhaps the best description of the Herbie Method. With that said, can you please advise me on the following question?
Q. Is there any guidance or restrictions on the Horizontal not Vertical distance between the emergency and main drain pipe.
I know that you should have around 6 inches vertically but what about the horizontal distance between the 2. Is there any rule on this or is simply enough space that the glass or acrylic won’t crack when drilling the holes?
Thanks,
You are correct your assumption, the glass strength is the determining factor for how close the pipes can be placed together. Sufficient spacing of the holes is done to make the panel strong enough to prevent cracking, both during drilling and once installed with bulkheads and plumbing lines.
Thanks for commenting!
Thank you very much for this information. I have a 90 gallon RR with 3/4″ and 1″ holes in the overflow. I plan to use the 3/4″ as the main drain, with the 1″ as the emergency line. I have two questions:
– Does the rest of my plumbing (the return line) need to be 3/4″ since that is the size of the drain?
– I was planning to use a 1000 gph return pump. Do I need to downsize now that I will be using a 3/4″ drain?
3/4″ really cuts down on the amount of flow that the siphon will handle.
The limits of the system are set by the emergency line, and at full siphon a 1″ line can move over 1300 GPH (under ideal conditions). A 3/4″ line can only handle around 450 GPH at full siphon. I would look at getting a return pump towards that number or a bit below. You still need a bit of bandwidth to constrict the siphon to balance the overflow.
The size needed for the return line isn’t really related to the size of the drain. This is because the drain is only using gravity vs. the pump. I would still go with 1″ on the return line just to not have the friction losses that you get with the 3/4″ line.
Hi there I use the herbie method and love it. Perfectly balanced and couldnt be happier…the only thing is the water going down my main drain seems to be sloshing/noisy as it its my 45 degree bend. Is there anyway of reducing this? My main syphon has no vortex as its set correctly. The water goes down the drain through the gate valve and straight down to a 45 degree bend into another piece of pvc before going through a small piece flexi before entering filter sock. Have I done anything wrong? Thank you
If the siphon is not taking in any air then I would suspect the fitting. It is possible that when the 45 was plumbed, the pipes had some kind of burr on the inside edge of the cut pipe. Could also be extra cement in there. This would cause water to roll with a lot of turbulence and create noise. If possible I would try to disconnect the pipe and have a look with a flashlight.
I have made an update to the post that covers that question in detail. Thanks for commenting.
I’m about to get buy my first 125 gallon reef ready tank, though it’s for freshwater. On the Aqueon tank the dual overflows are left and right of center, on the Marineland tank they are in the corners, seems the marineland tank would be the better option since it would be easier to access (tank against a wall) but then you can easily see the pipes from the side. Any upside or downside to either that you can think of? Appreciate the help.
Advantage to the non-corner overflows would be longer weirs, as they would essentially have 3 sides each rather than 2. This is not a big advantage though, so it’s more personal preference. I would never buy one of the Aqueon tanks with “Megaflow” overflows because they place the weir inside an outer shell, which is designed to draw in water from lower in the tank. It mostly succeeds in creating a tiny 3/8″ gap for detritus to settle or for a fish to jump into and get stuck.
Got it. Thanks for the input.
For some reason my last post was marked as spam…
I love this site! I’ve already learned a lot in here. Herbie gave me the link over on RC. I’ve read
through everything two times now. I have a question, if you wouldn’t
giving me a little advice?
In regards to: “Size of Plumbing”
You – “If your tank came pre-drilled with 2 holes in the overflow
as in a lot of older “reef-ready” tanks, use the one with a larger diameter
(usually 1″) for your emergency and the smaller diameter one for the main
siphon drain. Keep in mind that your flow will be drastically reduced on
smaller size pipe.”
Me – Would beefing up the main siphon drain increase the flow then?
I have a 55 gallon reef ready tank ( pre-drilled on bottom).
Bulkheads are 3/4″ for the main drain & 1″ for the emergency drain.
I’m figuring 6x Turnover rate x 55 Gallons = 330gph.
Reef Central’s Drain/Overflow Size Calculator results are:
Recommended minimum drain pipe diameter = 0.75 inches
Recommended minimum linear overflow size = 5 inches.
1) What size pipe would you recommend that I use for my main drain?
Should I stick with 3/4”, or beef it up to 1” using a reducer?
2) Should I stick with the 1” pipe for my emergency drain or
beef that up too?
I truly appreciate any advice you could give me.
The constriction point of the bulkheads dictates how much flow is possible through the pipes. Up-sizing the pipe runs before and after the bulkheads may lessen friction losses but the effect on increasing actual flow is minimal. I would not bother with upsizing either pipe. A 1″ emergency is suitable for a 55 gallon.
Sounds like you have a good understanding and you should be okay with a pump running about the 330 GPH you calculated. On my 52 gal cube (the one in the picture in the thread) I ran a Mag 5 pump – it ran at about 350 GPH with head loss. It had a 1″ main siphon drain and 1″ emergency on it.
Thanks! I appreciate your advice and explanation. It’s good to know that we have similar tank size, bulkhead, and plumbing. Now I can order my supplies and get started.
I like the way you plumbed your 52 Gal. What type of piping or tubing did you use coming out of your overflow box?
It looks like pvc, but has a curve to it. I could really use something like that with my set up!
The curved pipe is Flex PVC. Here is where all the different pipe materials are discussed and compared: http://gmacreef.com/reef-tank-pipe-material/
I drilled my HOB overflow with u tube to do a Herbie. I am using 1″ drains. I cannot get my drains and return to match. I either lose u tube siphon by draining too fast or it doesn’t drain fast enough which will overflow the main tank. Any suggestions?
My opinion on these hang-on overflow boxes is that they should not be used at all. Too risky. Your time will be much better spent drilling the tank and adding an overflow like a Herbie or Bean rather than fiddling with a U-tube overflow box. I go over them in a little more detail at the bottom of this page here: http://gmacreef.com/aquarium-overflows-durso-herbie-and-bean-setups/
Thanks for the reply. My problem is that my glass is tempered so I can’t drill it.
I hear ya, discovering your tank can’t be drilled can bring you to a fork in the road of sorts. A lot of people find themselves in your position as they progress in the hobby. You have to decide: get a new tank that is drilled, or try to go the route of hang on the back equipment. There are a lot of benefits that come with having a sump, and Hang-on overflows can look like a good option, but they can’t handle a lot of flow safely. Getting a new tank is often the best route to take even though it’s more cost/time to set up.
I will soon be setting up a 65 gallon with center overflow to a 20 gallon sump in the cabinet below. I understand the best design will have both drain pipes completely vertical. Since my sump is directly under the tank the drain pipes will be in the center of the sump. Wonder about sump layout in that case. Should I have the first chamber in the center with skimmer? Water flow to 2nd chamber on one side with return pump? I could tee off return line with one pipe as return to display tank and the other with valve going to fuge section on opposite side which will flow back to center section?
Ideally yes, you would have your drain pipes coming down completely vertical. In practice, it is rarely possible to have them that way. I try to say “as vertical as possible” just because if you try to plumb in a long horizontal run then you can run into siphon starting issues. So it’s best to use 45’s instead of 90’s or go with flex PVC in order to have the pipes have more of a straight shot down to the sump.
As for your 20 gallon sump, I would try to go with something larger if possible. a 20 gallon will most likely only allow for a 2-chamber design, while allowing enough volume for back siphoning and drainage. The sump article goes over this in more detail. http://gmacreef.com/reef-aquarium-sump-tank-design/
What do you think of this modified Herbie design?
https://uploads.disquscdn.com/images/6ae130f9c0d0d594d6fe6b2d77a05414e0f7c80c90a616fcc776bf85a198c883.jpg
I think it’s good that you posted this before building it. For one, the siphons simply won’t work when teed like that to the emergency standpipe. The emergencies must be individual runs and also not in a “T” with other lines. They should go in the place of where your returns are, and then you can plumb new return over the tank rim. See this page for more info: http://gmacreef.com/herbie-dual-overflows/
Also – you don’t want your siphon valves under water if you can help it, or in a hard-to-reach place like inside an overflow. One last side note – plumbing your R.O. system to your tank is rarely worth the time saved vs. the risks you open up if something fails. Thanks for commenting and posting the diagram.
I recently set up a herbie overflow for my 110 gallon reef tank. I have a really long run down to my sump in my basement. I placed my gate valve below my display tank as I didn’t want to have to continually run downstairs. What I’m finding is I can’t seem to keep my siphon, it works fine for about 30 minutes and then I lose it and I can hear air and water running though my valve. Do I need to move my valve downstairs? Or could there be Something else causing my system to fluctuate.
When you have a siphon drain with a basement sump, there is a lot of head height. This means a significant amount of negative pressure is in the siphon line. At full siphon, leaks in the fittings will not weep out water but instead draw in air. Hard to say for sure, but your problem could be caused by an air leak somewhere in the line. You could double check those fittings.
The siphon may be starting initially but then tapering off due to the air leak. This would cause the water level in the overflow to lower, eventually slurping air through the siphon’s inlet.
The valve should most likely be moved to the basement closer to the sump – there will be less issues that way. The siphon will start faster too. Having it nearer to the sump will also make it easier to find the right adjustment amount for the valve. The siphon should restart on it’s own when the return pump is turned off then back on.
I have a few feet of horizontal run over to my RDSB Rubbermnaid tank which then drains to my sump. The horizontal runs are still angled downward but I cant avoid a 90degree out of the bottom of my overflow box on my 100g. The Durso was working flawlessly and super quiet but I wanted to increase to 1.5″ and have a backup drain. I’m converting my 1″ inlet to a 1.5″ E-drain. Can you advise if the Herbie still be a good recommendation for me, or try something else? Will I run into problems starting the siphon? BTW, I’ve shortened the long run and now it just dumps into the corner of that rubbermaid tub. THe pic is from when I first set it up. I’m also plumbing my daughters seahorse tank to flow directly to the rubbermaid, but the return pump does “T” off to provide it with water.
I wonder if I shoudl just keep the 1″ return line that’already drilled through my overflow box and just add an air tube to make sure the air hole on the Durso always has air. AM I asking for trouble? The overflow box has teeth and I don’t have any snails that would fit through it. Just some cowreys. Thanks!
https://uploads.disquscdn.com/images/0fd8e2d3e0c7ea7e293e08f6a0e8f6bd0159560cdf42e5d3b4f48c7726e3c9a8.jpg https://uploads.disquscdn.com/images/8a33de9964c5dfb6e5b5eb65d912c51642e10e88b4f9e7761dc055635a0c5688.jpg https://uploads.disquscdn.com/images/c6570e8f0a2f6de4aa1b649f6e8209761d0aeeca1ac0a1407f07400d844033e8.jpg
It is a bit hard to tell exactly how much vertical drop you have in the drain line, but your horizontal run doesn’t look too bad if you shortened it like you described. The ability for the siphon to purge the air from the pipe is also dependent on the rate of flow rushing through the drain. Having a larger return pump would mean less potential air locks in the siphon line.
In just about every case I would say that a Herbie drain will be better and safer than a Durso which has no backup.
Thanks for this excellent information! I just purchased a 180 gallon tank and 65 gallon sump, with plans to start up a reef tank. I was hoping to use the Herbie drain set up, but am unsure if it will work with my set up.. The display tank is brand new, but came pre drilled, with 2 holes at the bottom of the side pane, and one at the bottom of the 6′ pane.. The hole on the 6′ pane will be capped and unused, but the two side holes are where I was planning my drains. Using these would mean I would have to have 2 90° elbows, one inside the tank and one outside.. Would this create too much of an air lock? I’ll still need one more join, either another set of 90°s or a 45° to hit the sump, which will be housed in the stand. Thanks for any advice you can give me!
Can this be used to quite a dual external overflow box?
If you are referring to an over-the-tank overflow box (the ones with a U shaped siphon tube pulling water over the tank’s trim) then some of the concepts may be applicable. These have a high risk of flood however and I discourage anyone from using them. Here is a post that goes over the major methods where I talk more about these boxes. http://gmacreef.com/aquarium-overflows-durso-herbie-and-bean-setups/
This is a fantastic article and I thank you for putting it together.
I have an Aqua One Minireef 160, (I60 Litres = about 42 Gallons) which comes with a functional but exceptionally loud durso type standpipe.
The tank has a side weir and two plumbing points. One is 1.5 Inches diameter, the other 3/4th Inches.
Should I use the 3/4th pipe for the main siphon, with the large 1.5 inch pipe as the emergency?
The system comes with a non-adjustable return pump called a Moray 1300, which puts out 1100L/R (about 290 GPH). Would this be too powerful for the small 3/4 inch siphon pipe to handle?
Great website.fantastic work. Very professional presentation. I ask the question lot of people which method is good herbie ,animal bean or something else.give me your suggestion for my 150g.
Always a Bean Animal (3 drain system) if you are starting from scratch and have enough space. I have a Synergy Reef Shadow Overflow on my 150gal system that I think is a great option.
Hi, I’ve read an article about three types of overflow piping and have a question.. My overflow has three holes. One for a neat secure return line and two for a drainage. It looks to me like a Herbie style but instead of lowered pipe with strainer I have a Durso pipe with air holes on top but the “U” pipe is extended about 9″ down the weir box. The other of two is just an emergency drain. Shall I leave it this way or cut the Durso to make it the proper Herbie style? If I leave it is it going to be noisy and what about that extended bit? Sump can still handle the extra water of 9″ pipe at Durso in a case of a pump failure. Thank you.
Yes, I would remove the Durso-like downpipe from that drain and install a strainer instead. You could also think about converting the return line (3rd pipe) into an additional drain to create a BeanAnimal system. This would depend on the tank size and plumbing size somewhat to see if it was worth doing.
Is the strainer really a must? Won’t comb on weir hold all debris which could clog the syphon? Btw I removed Durso style and the syphon is totally quiet plus if all water would go by E pipe it will be noticeable cause noise with air.. 😉
Yes it is a must! Something small could easily pass over the weir and make it’s way to the valve, potentially clogging it. Most weirs only prevent larger objects from passing over with their wide teeth. Strainers just protect the valve on the siphon from becoming totally blocked. Strainers don’t need to be cleaned very often either – so you aren’t saving much work for yourself by not having one.
I have plans for a freshwater 265 with corner overflows and I plan on going with a herbie and running the return line up the back but I’m stumped on choice of sump, I’m restricted to the space underneath in the stand.
Are there any specific sumps that work really well with this drain method, prefebly one that can accommodate 4 drains and not take up a lot of room? I also have the choice of attempting to make my own sump but I do not know the best way to set up the baffles to maintain siphon.
If you read my sump design article you should get a basic understanding of how baffles and bubble traps work. I don’t really have any pre-made sumps I can recommend, as most of them I see look cool but also have extra features you don’t need.
My Tank (a 135 Gallon Reef) – will “Siphon” into an Inline Custom Made (DIY) Filtration Sysytem – Not a Sump but all Enclosed similar to the Lifeguard Aquatics In-Line System – I believe this Herbie system will work fine with that type of plumbing where virtually no air gets in unless the Emergency Siphon Kicks in – However, you do not mention this type of system for the Herbie OverFlow System – Will the Herbie work with an Inline Closed System ? Thanks In advance for your thoughts. Kevin.
It most likely won’t work. You will have problems any time you create resistance on the siphon line. This is why it’s also not advisable to have your siphon line feeding directly into a skimmer.
Great information. The way my tank is setup is going to prevent me from putting a valve on a vertical run b/c I have my sump in a closet to the left of tank. I know you mentioned not to have any horizontal runs but with the sump in a closet offset of the tank I couldn’t avoid it. What major issues will I have by putting the valve on a short horizontal run?
I am using the new Eshopps Nano drilled overflow box (it is drilled, not the siphon kind) similar to the synergy shadow overflow box. It has two 1 inch drains. My return pump is the new COR-20 connected my APEX.
Thanks for any advice
The issues with horizontal runs on the siphon drain line just mean it can’t purge air as easily. I advise people to avoid having too much horizontal run if they can, because the siphon sometimes will have starting issues. It is a generalized rule however, and also really depends on how much head height there is. If there is 5′ of vertical distance between the overflow and the sump outlet, then it might not be an issue. It also depends on pipe size and how fast the water moves to begin with.
As a matter of fact this is almost the exact question I was coming here to ask. I am in the middle of a 60g cube build tha tI bought used, and I started redoing everything and without major renovations somehow the only option I had space wise was to plumb it (bottom drilled tank) dropping into a street 45 straight out of the bulkhead and putting my gate valve there on the 45d slope for about 6 inches or so and then I had to run it horizontal for about the space of a union (a few inches) and then into a 90 that takes it into the sump. do you think I will have issues doing it this way?
Most likely not a problem. Short horizontal runs rarely contain large enough air pockets to impede a siphon from starting. A horizontal run would be more likely to be an issue with someone who was plumbing their drain with a pipe that spans multiple feet across. For instance on a long tank, where the drains and sump inlet chamber were on opposite ends.
My sump is in a basement under the room where the tank is. I have 3 lines from over fill box; emergency, siphon, and standpipe.
I cannot get any water down siphon probably because I have about 25’ of flexible pvc running to sump. I also did not instal a valve on on the siphon to toggle the flow. I’m planning on getting g a valve installed, will this fix my problem? With out any elbows installed on sump and standpipe inside the overflow box, I have plenty of drainage.
A valve is absolutely necessary with this method. You would want to install it down near the sump in your case rather than up near the tank.
What do you recommend for adding an overflow box to a standard tank? This would involve drilling the rear of the tank. Add-on boxes get glued to the back glass – and may be only 2-4″ deep and 5-6″ tall.
Would you just do you best to get a strainer into one hold, then put an elbow in the other hole with a riser nearly to the height of the overflow box’s teeth?
Since I don’t know the size of tank or plumbing size I can only give general advice.
Most of the pre-built commercial overflow boxes have an internal box for the weir on the tank side. They also have an external box for the standpipes to go.
The outer box is generally made a bit larger. It is larger in order to provide water volume to the siphon drain.
There has to be sufficient water volume above the inlet (strainer siphon drain) in order for that drain to purge the air downwards through the pipe.
If you go with a single internal box on the tank side and plumb into it from the back, it generally needs to be of sufficient size. This means a large unsightly box in the tank.
On my new tank(250 gallons) which is waiting to be installed, the tank manufacturer drilled 3 holes to accommodate my 3- 2″ drain lines. My external overflow is 24″ deep like the tank and 17″ long and 6″ wide. He said to cut one pipe to 3″ high and install a ball valve on it. The 2nd pipe he said to cut to 6″ high and install a gate valve. The 3rd line he said to cut just above the height of the water in the tank. What are your thoughts on this?
I am not sure why you would need more than 1 valve. The 3rd line is likely intended as a dry emergency, however you will generally cut that just below the display water level / overflow teeth.
Please could you explain to me why on the Bean Animal design there is common use of inverted elbows? If the purpose of the AB design is to build in a further 3rd pipe fail safe, why not just add a third dry pipe to the Herbie design? Why have an inverted elbow for the main siphon instead of the fully submerged standpipe as per the Herbie? Same question about the secondary drain – why the inverted elbow with a vent tube? What purpose does this serve or improvement offered over the standard Herbie set up. Thanks in advance.
Your question of “why not add a 3rd pipe to the Herbie design?” is valid. The Herbie design is used typically under 2 circumstances. First, you are plumbing an existing tank that only has 2 drains in the overflow, where adding a 3rd would be too much work. The the second, you have limited room and do not necessarily need the capacity that 3 pipes can move. An example of this would be a 40-50 gal tank. If you are moving less than 500 GPH then you can easily and safely use a Herbie design with 1″ lines. If you are planning a new system and you have room for it, you should in all cases add a 3rd drain to build a BeanAnimal setup.
As for why you see downturned elbows on the BeanAnimal, here are some very simplified answers: For primary – prevent air entering the pipe when siphon is starting and also protect against larger obstructions. For secondary (with air vent, also known as open channel) – reduce noise and allow air to enter to allow a consistent amount of water to flow down the pipe without it going into siphon.
Thanks for your reply – please may I probe further?
I was under the impression that it was desirable to be able to visually see and inspect the secondary drain which would be prevented by an elbow? I was also reading that the secondary drain was only intended to take the tiniest trickle, hence it should be silent and there shouldn’t need to be concerns over noise?
I’m starting from scratch with a 4x2x2 and want to get this right and have all options open to me, but I really need to understand not just what, but ‘why’ and your articles are proving very helpful in this regard, I thank you.
A lot of the full with coast to coast style internal boxes are very shallow – how do they overcome the challenges of needing to have the main drain 6″ below the surface to prevent vortex and pulling in air?
The Herbie design has a different set of best practices because there are only 2 pipes available. The secondary (open channel) of the Bean is different than the Emergency drain of the Herbie. Limiting the flow to a tiny trickle is done on the Herbie for the reasons stated in the article.
The Bean has a 3rd dry emergency line so it’s capacity is never an issue because no water runs through it. It’s open channel can run more than a trickle with an added layer of safety and less fine adjustment. This is the main advantage of the Bean design over the Herbie.
I am trying to be brief with these answers about the Bean design. This is done to avoid confusion about the Herbie. Thanks for your questions.
As for the other question about the Herbie, having the main drain 6″ below the height of the E-drain is a best practice. It is a suggestion that takes many things into account. If people follow it, then problems are less common.
However 6″ is a rule of thumb only. It is based on a commonly sized internal overflow box inside the tank (12″ x 6″ X tank height, 1″ lines). The actual distance of the inlet below the water depends on 3 things. Volume of the overflow box, turnover rate and pipe size. In some cases less distance is sufficient to prevent a vortex.
Hi, great article and nice to see you’re still taking questions on it. I’m pre-planning for a 112 gallon SC Aquairum. My first sump system. I understand to whole drain/siphon method , and adjusting the drain valve, but what about adjusting the return pump? Do you just size a return pump to run full bore and all your adjust is in the drain? Or do you oversize the return pump a little and valve it off a certain amount? Just curious if most adjust the drain and return with valves, and what is the procedure there. Especially if you plan to run some reactors with the return line in the future.
I prefer having an appropriate sized return pump that runs full blast, and adjust the siphon valve to that. This gets the most out of the pump when it comes to flow in the tank.
Bigger pumps generally mean louder, so I don’t like to oversize the return for this reason alone.
Manifolds are a personal preference thing, I don’t like to run them because they usually result in a bunch of constant adjustments I don’t want to do, if several valves are connected in the same line, then they all affect each other with back-pressure. I currently only run one reactor that has it’s own small pump. Dedicated pumps also allow for non-247 usage of a reactor or using a timer, so there is some advantage there.
Good article, except the following statement is false ” it is not as much about how deep, but rather how much water volume is above the siphon inlet. More water volume above the inlet = more water forcing the air down the drain to create the siphon effect.”
Volume of water has no effect on pressure, only depth. If it did everything in the ocean would be crushed by the pressure at a depth of mere inches.
From http://hyperphysics.phy-astr.gsu.edu/hbase/pflu.html – “The pressure exerted by a static fluid depends only upon the depth of the fluid, the density of the fluid, and the acceleration of gravity. The most remarkable thing about this expression is what it does not include. The fluid pressure at a given depth does not depend upon the total mass or total volume of the liquid.”
The point I am trying to make is that in a small overflow box, more water volume above the inlet is better. Volume can be achieved with both a larger overflow box, or by lowering the inlet height below the water surface. Thanks for your comment, that link is helpful.
Just set up a Herbie based on this advice. Thanks for the well written document. Dead quiet! Thank you!
In the spirit of paying it forward, I just set up a 140G tank in the living room, with all of the plumbing (40G sump etc) in the garage. After a bunch of water flow testing (and a tiny bit of math), I realized that if you want to get 10X turn over, then you need 1400 G/hour flowing through that system. A 1″ PVC pipe is good for about 700 G/hour (less if you have all kinds of turns and twists like I do). So, therefore, I would recommend using a bigger return than you think. 1.5 or 2.0″ gives you headroom and then you call dial it down with a gate valve. Go the biggest you can afford in the tank.
In terms of Herbie vs. Bean, the question of “safety” always comes up. For me, I don’t get it. If you design your sump right, there shouldn’t be enough water in the last chamber (with the pump in it) to overflow the system (even if the return lines were all blocked). If you do it right, it should be almost unimaginable to get a tank flood. Yes, the pumps will run dry and burn out, and that would suck, but you shouldn’t be able to get the nightmare of water all over the floor. If you are fancy you could even put a float switch on the pumps to stop them when they run dry. I am not missing anything am I?
I would agree that just about any time you are planning on having a turnover rate over 1000GPH then you should use 1.5″ pipe on both drains and the return. The price difference between 1″ and 1.5″ pipe and fittings isn’t that much when you consider a complete build.
The safety argument is always present. A Herbie can be run safely no doubt. A Bean setup with 3 drains will always be safer option than a Herbie with 2 drains.
In the third paragraph you describe the return pump chamber in the sump. Designing it to be very small has a few disadvantages. The main one is that it can’t deal with all the water that back siphons when the return pump is turned off. This page goes over that in more detail: Reef Aquarium Sump Tank Design.
I just setup a new tank that had a corner overflow with 2 holes (3/4 & 1″) drilled in the bottom. After reading your article I decided to go with a Herbie overflow, but I’m having a small issue.
My main drain is a 3/4″ pvc pipe that has (2) 90 degree turns and a pvc gate valve that I picked up at a local hardware store. and I’m utilizing the 1″ pipe as the emergency drain which has a straight shot down to the sump. The main drain is very slow and can’t keep up even with the gate valve wide open. So the water in the overflow is just above the emergency drain which is now draining most of the water. I can’t seem to lower the level of water in the overflow.
My return pump is a 2100 simplicity dc pump that I have on one of the lowest settings. It’s 3/4″ PVC with no manifold.
I’m wondering if it could be the gate valve that I picked up and restricting flow, maybe I need to replace it with a new one?
I think the problem is that the pump is oversized for your tank/drain size. I looked up the specs and it runs at approx. 2100 GPH at full power. Even all the way turned down it still runs at 65% of max (10 steps down from 100% of a 3.5% reduction each step). So that is still roughly 1300 GPH. A 3/4″ siphon line is only suitable for tanks up to about 50 gallons because the drain can only handle about 400 GPH give or take.
So your options are to either upsize the main siphon drain OR divert some of the flow back into the sump OR Get a new pump.
Even if it’s possible to upsize the siphon drain to 1″ I would be a bit weary of pushing 1300 GPH to the tank as that is getting near the top capacity of a 1″ drain.
Hi
I’d like to say congratulations on a very successful website. You have obviously set out to educate others and share your experiences regarding reef keeping. You have explained some crucial components very clearly and informatively with a very user-friendly layout to your website, along with fantastic, informative and clear diagrams. Thank you for taking the time to put all this together! And what’s more, your commitment to continually answer comments and continue to educate is to be fully commended.
My main reason in reaching out was to give kudos; however, one question, if I may:
In the wetwebmedia article you have provided a link for – about flow rates and bulkheads (http://www.wetwebmedia.com/BulkheadFloRateArt.htm) – they mention that using a strainer can potentially cut the amount of flow draining to the sump by half. Given that other ‘best practices’ are followed, would it not be possible to put the strainer on the e-drain instead? (seeing as it only needs a trickle anyway)
Regards
Pete
Pete – Thank you.
Strainers definitely have the potential to reduce flow. Using one is necessary to protect the valve when using the Herbie setup. When you close off the valve, the opening gets smaller.
When you inspect the mechanism of a valve, it is also evident how it can clog. The ball creates a ridge inside the valve body when you start to close it off. This means even a small piece of debris can get stuck.
As for strainers cutting the flow by half – this seems like a blanket statement. Strainers come in many forms, the best ones being those that maximize surface area of the mesh. This allows more debris to collect before flow is reduced to the drain.
Hi,
Thank you so much for these articles. I am going to run the Herbie method and read that the return line should not be Tee offed. As such, what would be the best way to control the return flow w/o killing the life of the pump? Would a union valve or gate valve work?
My overflow is rated for about 600 gph, and the pump says 1400 gph out the box, but after taking into account for the height and what not, I suspect it to be about 700 gph or so.
Unions allow you to detach and clean the valves themselves right?
Thanks.
You can Tee the return line, there isn’t anything wrong with doing that.
In certain cases Teeing the return can be less than ideal. For example such as using a manifold, it will affect the siphon drain. A manifold will introduce ways for the the turnover rate to change. So if the turnover rate changes, the siphon drain will need to be adjusted more often. If you have a Bean Setup, this won’t be as much of an issue because it can deal with these variations in flow with the open channel.
There can be an advantage to Teeing the return line above the pump. It allows you to redirect some of the flow back to the sump without an extra pump.
You can use either a Gate Valve or Union Ball Valve. Any valve with Unions will allow you to take it apart for cleaning, most decent valves nowadays have them.
Need to silence a 250 reef ready with 2 corner overflows. Currently running a durso and return in each overflow. Wondering if I can convert one overflow to s Herbie overflow and keep return line in it . Thinking the other overflow (durso,) could act as the emergency drain should the Herbie fail. Any issues with doing this?
I would get rid of the Durso setup completely. An emergency must be an open drain with no possible restrictions on it. There is more info over on the Herbie for Dual Overflows Guide.
Great write up! I have an SCA 100 I’m preparing to plumb. 3 holes in overflow box, middle for return line which Ts into lockline. The issue is the drain and e-drain will not be accessible if I glue the wet side return pipe. Too narrow in that box with eurobracing. Do I just slipfit the wet side return and rely on the lockline which threads through the acrylic box for return pipe stability? That way I can access the box and plumbing…
Mahalo!
Yes, that sounds correct. It’s generally not a good idea to glue the pipes inside the overflow box. You are going to need to get your hands in there for one reason or another. Using just a slip/friction fit should be stable enough. Bulkheads with threads on the flange side allow you to screw in the standpipes and are the best choice for this application.
I have an EA 900s Pro – after a few trial & error attempts I finally figured it out, my partner got on a household ladder with a torch and looked down the weir, I then turned the ball valve off, immediately the water level inside the weir rose to the level of the Emergency overflow pipe, I then opened the ball valve slowly until the water level is just below the Emergency overflow, fabulous – no noise at all apart from the flow into the tank from the return pump and a slight noise from the wave maker flow. So all the printed matter out there, which can confuse you, I found a simple way to stop the sucking & gurgling, Regards all – Gary from the UK
Thank you for the explainer page. I have a Herbie setup on a 60g cube however, I could NOT setup the gate valve vertically in the system. I had to come down from the overflow box to a 90 and run about 14″ or so horizontally, this is where my gate valve is. From what I understand is this still works, it just takes longer for the syphon to start. Am I correct here or is there anything I need to watch for?
The siphon drain will purge the air easier and restart faster if the valve is closer down to the outlet where it goes into the sump. You mainly want to want to plumb the drain as simply and as straight down as you can, but every tank can be slightly different. Installing the valve on a short horizontal run of pipe is generally ok if you are following the other best practices.
Thank you so much for this article, I’m about to get a tank custom made but want to make the weir and do all the plumbing myself and was just going to do a simple Durso set up until I stumbled upon this article and learnt about the Herbie method which is definitely what I will be going with now, thanks again, great information, much appreciated.